Get Started with Perspectives
What are Perspectives?
Perspectives in Harness Cloud Cost Management (CCM) provide a powerful way to contextualize your cloud spending according to your business needs. By creating custom views of your cost data, you can gain insights that align with your organizational structure, projects, or any other business dimension.
You can connect multiple cloud providers and external data sources and use them together in a single Perspective to get a unified view of all your cloud costs in one place.
Prerequisites
Before getting started with Perspectives, ensure you have:
- An active Harness Cloud Cost Management (CCM) account
- Administrative access to your cloud provider account(s)
- Necessary permissions to create and manage connectors in Harness
- Harness CCM Cloud Provider Connectors:
- AWS - Complete AWS Connector Setup Guide
- Azure - Complete Azure Connector Setup Guide
- GCP - Complete GCP Connector Setup Guide
- Kubernetes - Complete Kubernetes Connector Setup Guide
- External Data (Beta) - External Cost Data Ingestion Guide
Creating a Perspective
You can create up to 10,000 Perspectives.
To create a Perspective, follow these steps:
- In Cloud Costs, click Perspectives
- Click New Perspective
- Complete the following three steps:
Perspective Builder
- Enter a name for your Perspective (avoid special characters)
- Select a folder for organization (optional)
- Choose a default time view:
- Last 7 days
- Last 30 days
- Last month
- This month
Perspective Rules
- Click Add rule in the Specify rules for the perspective section. You can add multiple rules in a Perspective and their binding can use either the AND operator or the OR operator.
- Each rule can be set up using Operand, Operator and Values.
- Common
- Cost Categories
- Cluster
- AWS
- GCP
- Azure
- External Data
- IN: Include only resources that exactly match the specified value
- NOT IN: Include all resources except those that match the specified value
- NULL: Include only resources where this field has no value (excludes resources with this field)
- NOT NULL: Include only resources where this field has a value
- LIKE: Include resources where the field partially matches a pattern (uses regular expressions)
- For exact pattern matching, use
^pattern$syntax
- For exact pattern matching, use
Preview and Continue
As you build your perspective, a real-time preview appears on the right side of the screen that shows a graph of the cost data based on the rules you have added, along with a cost breakdown.
After configuring all rules, click Next to proceed to Budgets, Reports and Alerts.
- If no rules are specified, your perspective will include data from all cloud providers and clusters
- When combining cluster labels with cloud provider data, you must add a specific Cloud Provider filter.
Budgets, Reports and Alerts
Budgets
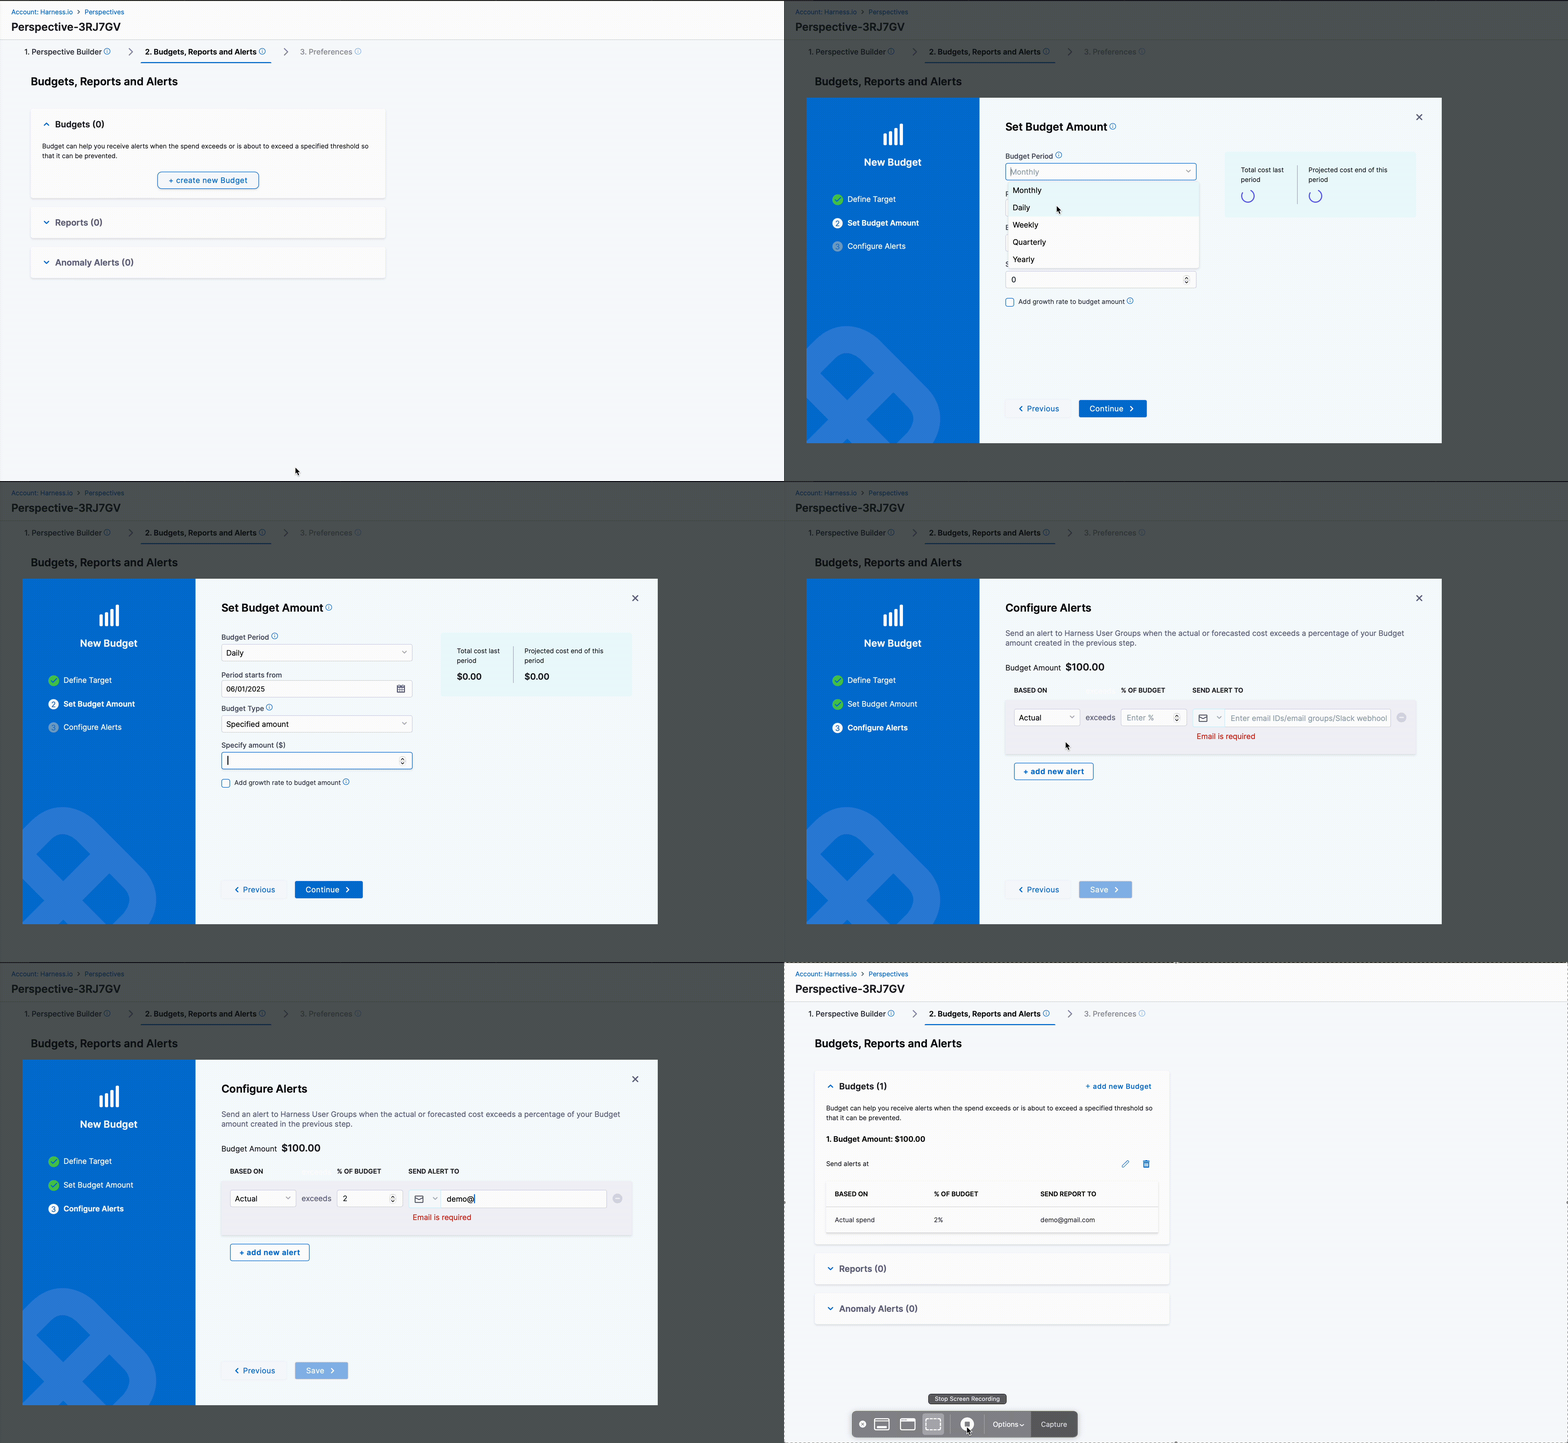
Budgets can help you receive alerts when the spend exceeds or is about to exceed a specified threshold so that it can be prevented.
You can add multiple budgets for a single Perspective. Click on +create a new Budget to add a new budget and set up Target, Budget Amount and Configure Alerts.
For detailed information about setting up budgets, see Setting Up Budgets
Perspective Reports
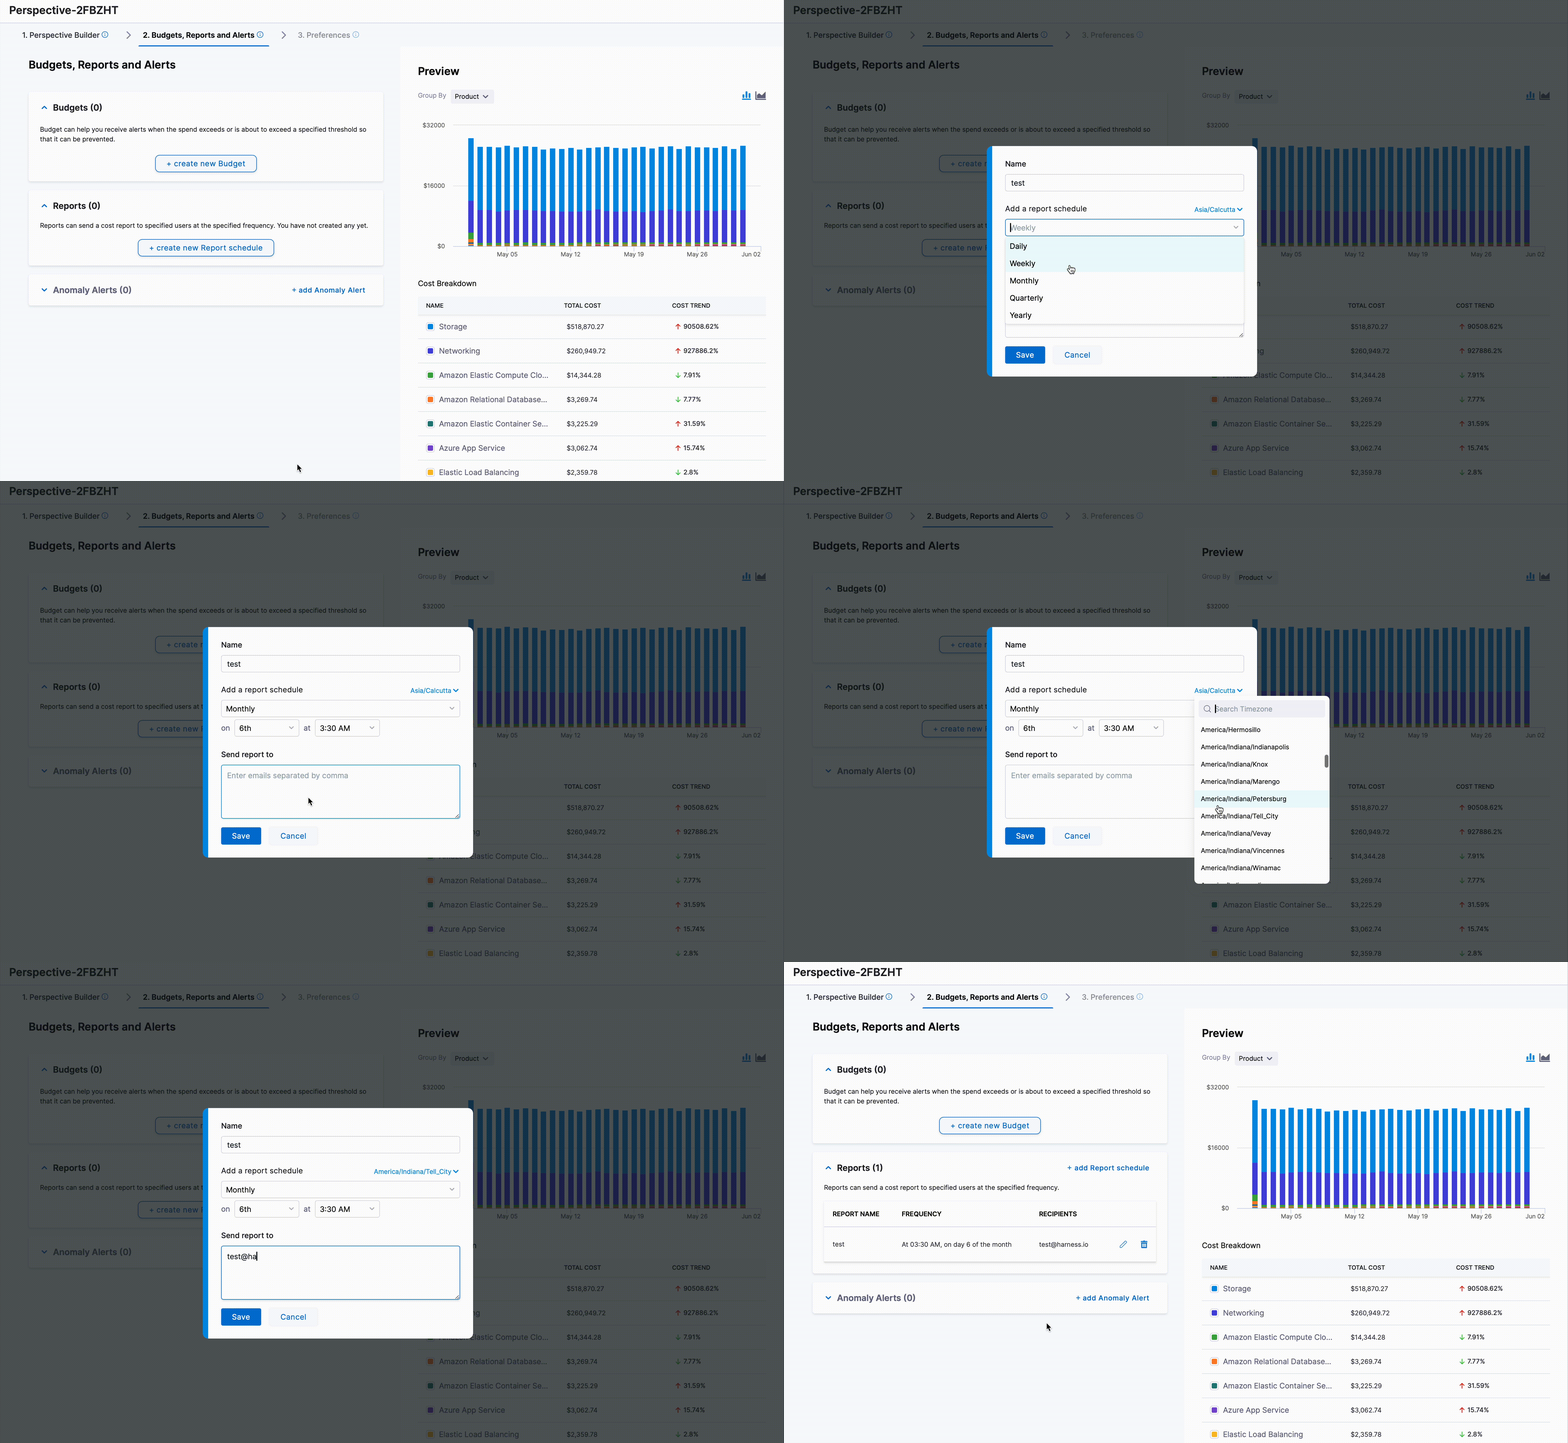
Reports can send a cost report to specified users at the specified frequency. You can create a report schedule for a specific perspective.
- In the Reports section, click +create new Report Schedule
- Configure the following options:
- Name: Name of the report.
- Time zone: Choose the time zone for the report schedule
- Frequency: Choose Daily, Weekly, Monthly, Quarterly, Yearly for delivery of reports.
- Select date and time: Choose the date and time for when the report should be sent
- Send Report To: Enter an email ID of the recipients. Email IDs are separated by a comma. Up to 50 email IDs can be added for sharing the report schedule
- Click Save.
Anomaly Alerts
You can also set up alerts for all anomalies in the current perspective. The scope of the alerts set via this option will be for the current perspective, i.e., the alerts will be set only for anomalies detected on the current perspective data.
- Click on + add Anomaly Alert
- Configure Name, Alert Conditions and Alert Channel. For details, see: Anomaly Detection
Additional Resources
For more detailed information about Anomaly detection in CCM, refer to Detect Cloud Cost Anomalies with CCM
Preferences
With perspective preferences, you have the flexibility to tailor the cost data presented in your perspective. You can opt to include or exclude specific cost data provided by the Cloud Service Providers (CSPs) according to your needs and requirements.
Customize how your perspective data is visualized with these options:
General Preferences
Show Others
The default perspective graph displays only the top 12 cost items. Enable this option to group all remaining costs into an "Others" category, ensuring you see your complete spending picture.
Show Anomalies
Highlight unusual spending patterns or sudden cost changes in your visualizations. This feature makes it easy to spot potential issues or unexpected charges that may require investigation.
Show Unallocated Costs in Clusters
In certain graphs, you may come across an item labeled as Unallocated. This entry is included to provide a comprehensive view of all costs. When you examine the Total Cost in the perspective, it encompasses the costs of all items, including the unallocated cost. This option is available only in perspectives with cluster rules. The Show "unallocated" costs on clusters option is only available in the chart when the Group By is using Cluster and the following options are selected:
- Namespace
- Namespace ID
- Workload
- Workload ID
- ECS Task
- ECS Task ID
- ECS Service ID
- ECS Service
- ECS Launch Type ID
- ECS Launch Type
Cloud-Based Preferences
- AWS
- GCP
- Azure
AWS-specific Preferences
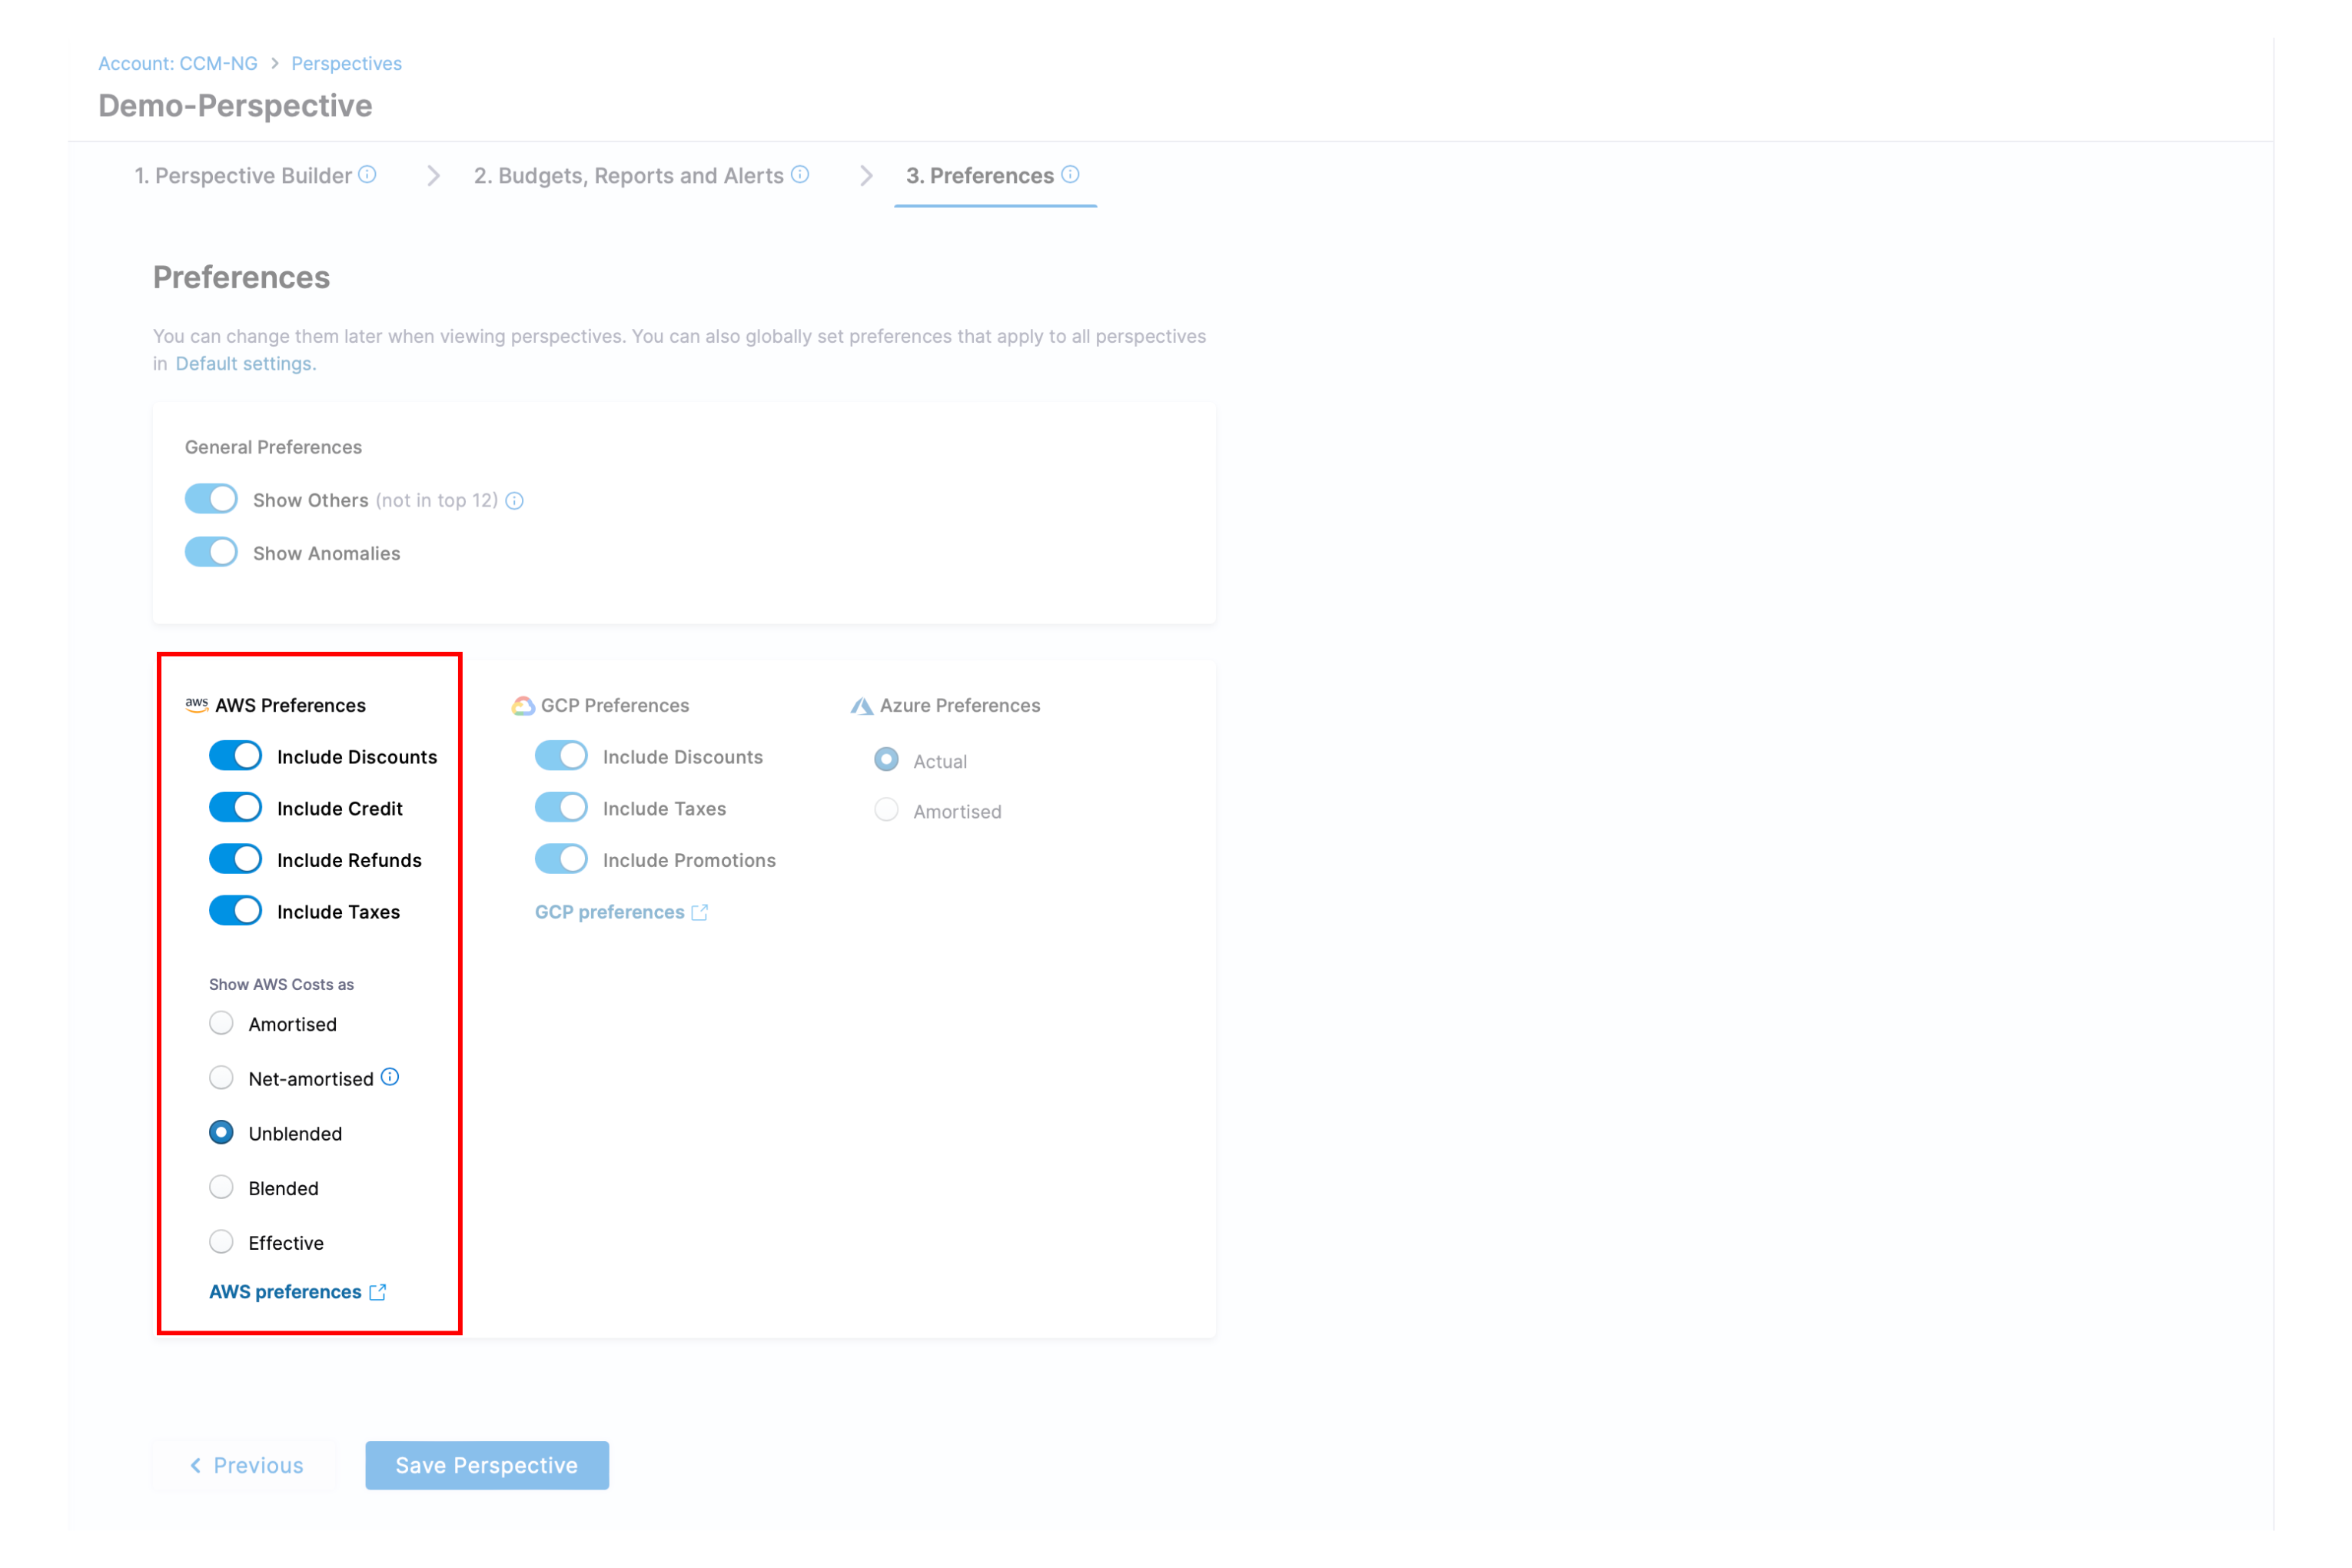
When creating your perspective, the Preferences section allows you to include specific cost factors sourced from the AWS Cost and Usage Reports (AWS CUR). These selected cost factors will be incorporated into your perspective for a more tailored and comprehensive view of your cloud costs.
- Include Discounts: Includes any discounts that AWS applied to your usage.
- Include Credit: Includes any credits that AWS has applied to your bill.
- Include Refunds: Includes the negative charges that AWS refunded money for.
- Include Taxes: Includes any taxes that AWS applied to your bill. For example, VAT or US sales tax.
- Show costs as: The following are the various AWS cost types supported by Perspectives.
AWS Cost Types
-
Net Amortized Cost: The actual cost of using resources, accounting for upfront payments made for Reserved Instances. It evenly spreads the upfront costs over the reservation term, considers monthly fees, and includes discounts like RI volume discounts.
-
Blended Cost: The total cost of using AWS services, which includes both upfront and usage-based charges, divided by the total number of usage units. Blended rates are the rates associated with total usage in an organization averaged across accounts. For a line item, the blended cost is usage multiplied by the blended rate. The blended cost is the cost attributed to the account's usage as a linked account in an organization.
-
Unblended Cost: The direct cost incurred for using AWS services, without factoring in any upfront payments or volume discounts. Unblended rates are the rates associated with an individual account's service usage. For a line item, the unblended cost is usage multiplied by the unblended rate. The unblended cost would be the cost of the account's usage if it were a standalone account. Unblended costs represent your usage costs on a cash basis of accounting.
-
Amortized Cost: The total upfront payment for reserved instances spread evenly over the term of the reservation. This method is used to allocate the upfront costs equally across the duration of the reservation, making it easier to analyze the cost distribution.
Example: Alejandro purchases a Partial Upfront t2.micro Reserved Instance (RI) with a one-year term:
- Upfront cost: USD30 (paid at the beginning)
- Monthly fee: USD2.48 per month
- Without amortization: Cost Explorer shows spikes of USD2.48 on the first day of each month
- With amortized costs: The upfront cost is spread evenly over the entire year
How amortization works:
- Takes the upfront USD30 cost and divides it across 365 days
- Calculates a daily effective rate by combining upfront and hourly costs
- For a t2.micro with an effective rate of USD0.165 per hour: USD0.165 × 24 hours = USD3.96 per day
- This provides a consistent daily cost view instead of monthly spikes
-
Effective Cost: The average hourly rate obtained by combining both the upfront payment and the hourly rate.
EffectiveCostis calculated by adding theamortizedUpfrontCostForUsageto therecurringFeeForUsage.
GCP-specific Preferences
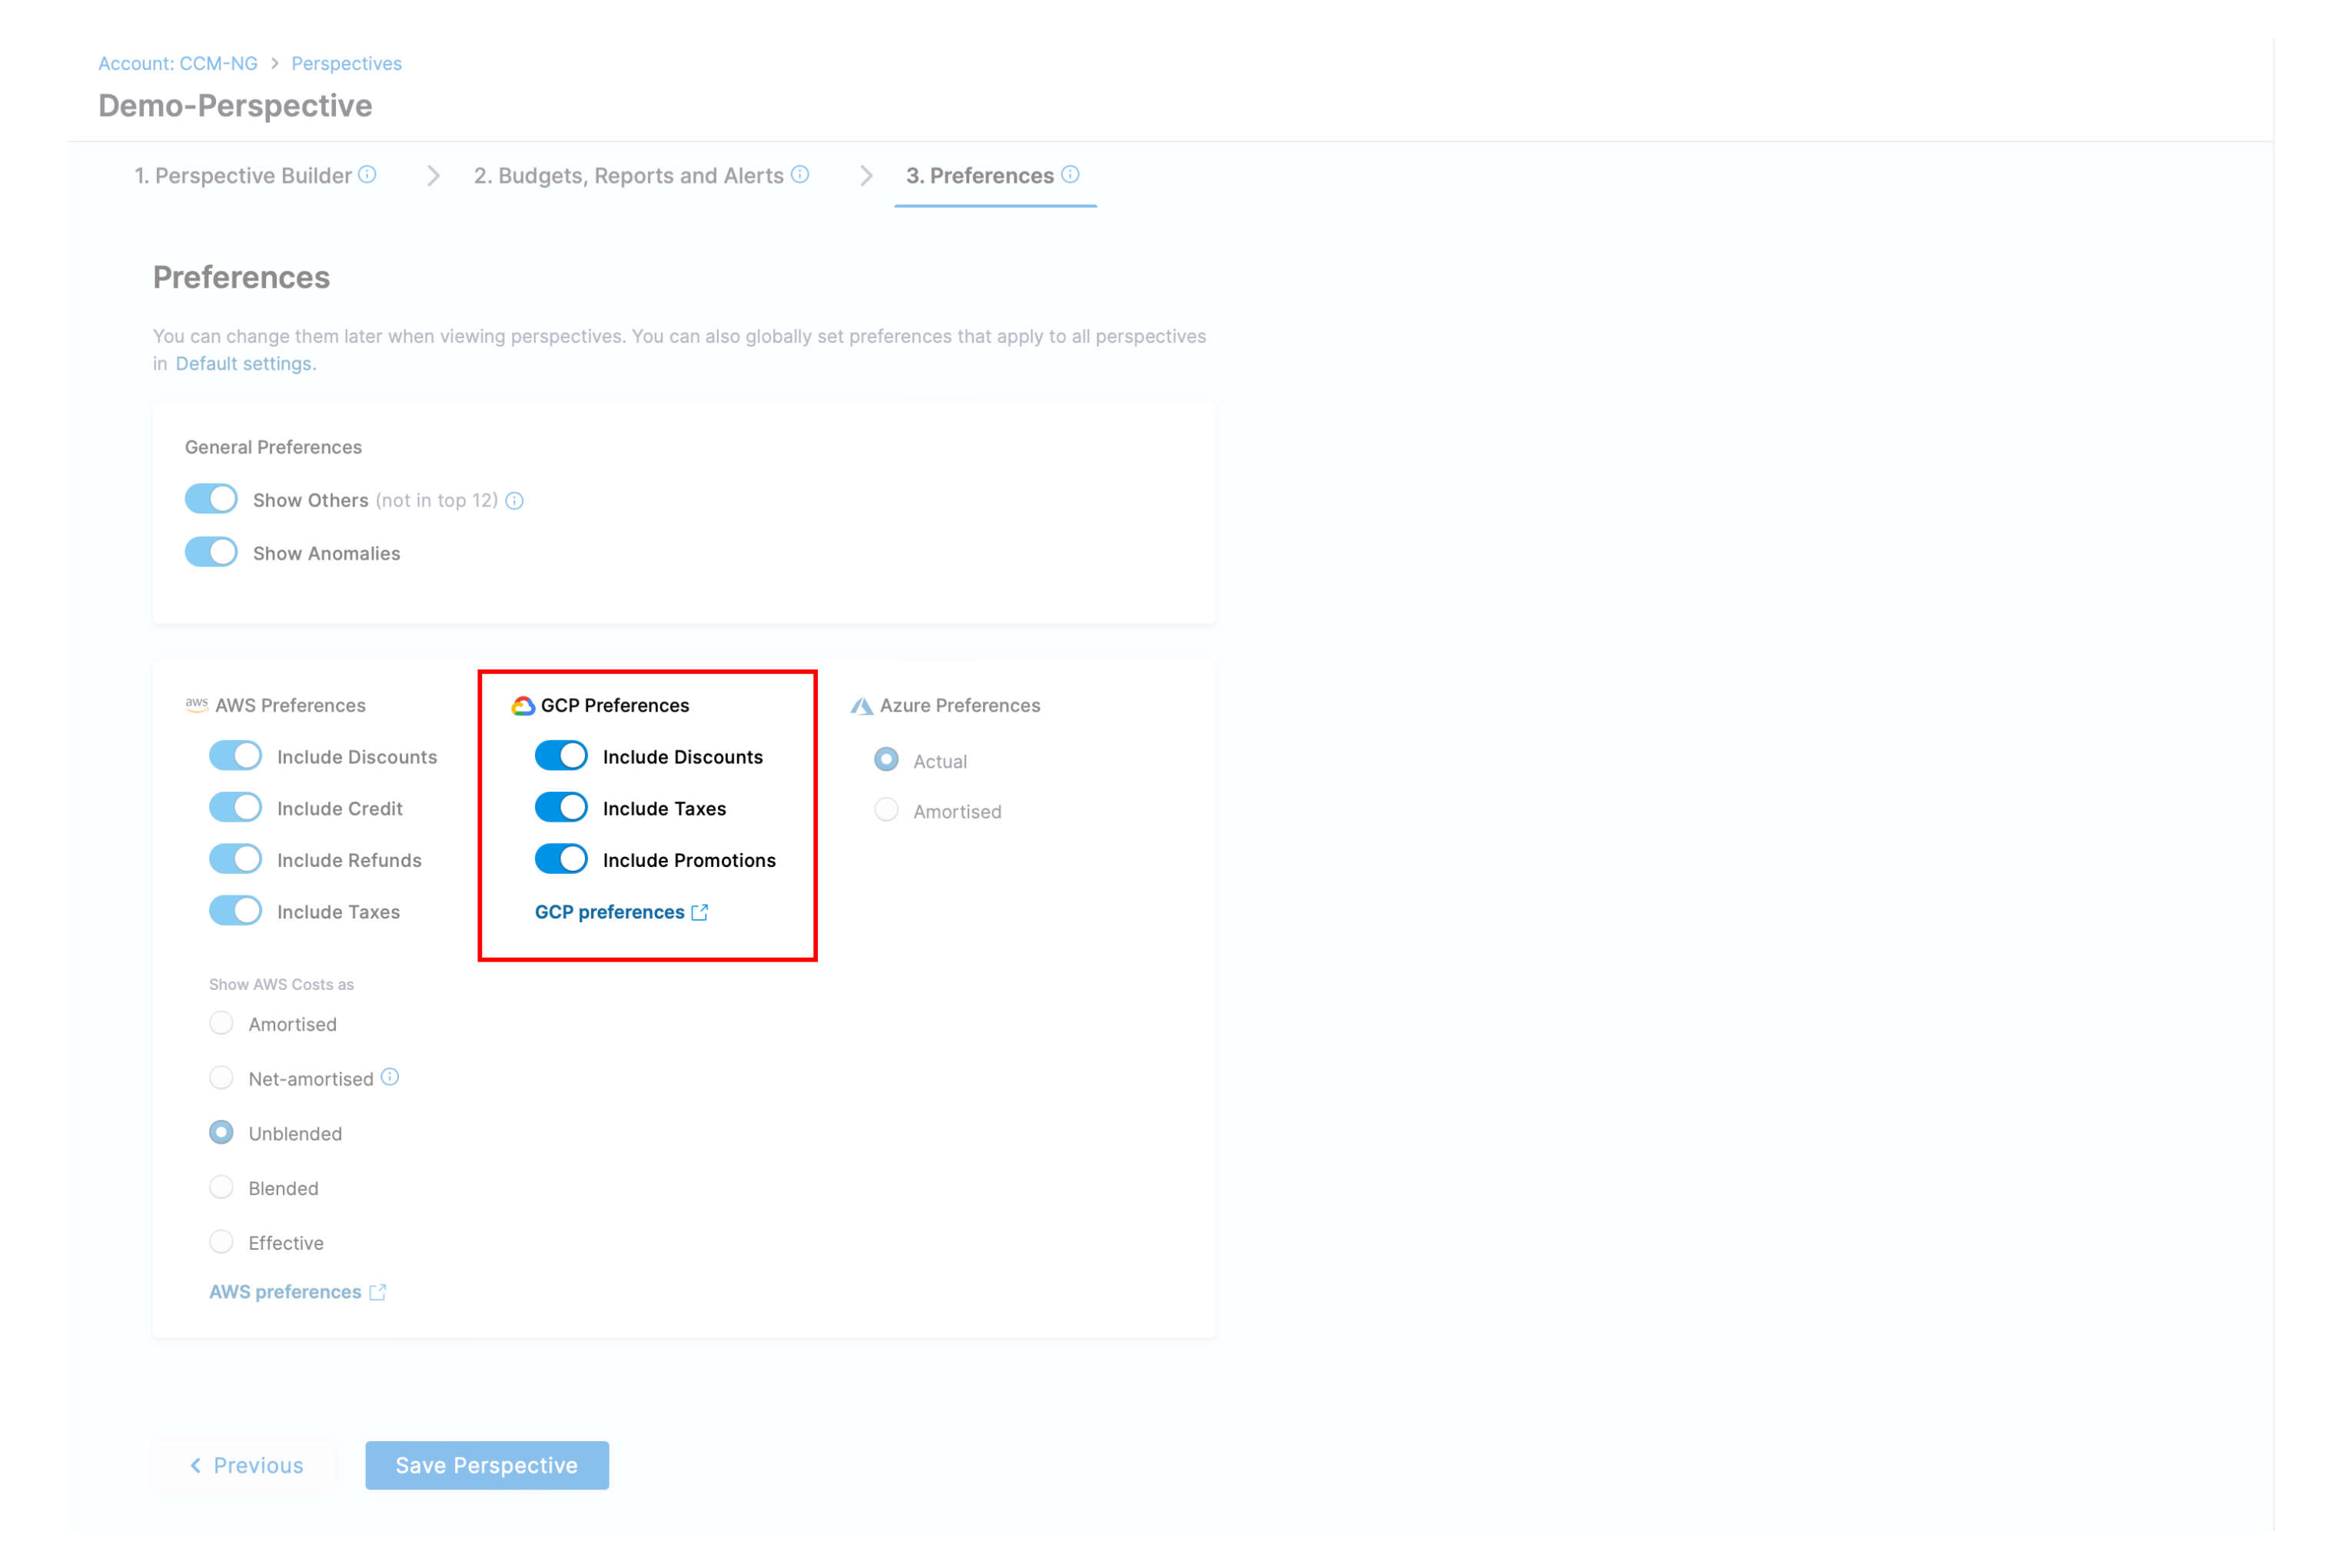
The following cost factors retrieved from your GCP Billing Export data can be included or excluded in your perspectives for a more comprehensive view of your cloud costs.
- Include Discounts: Includes any discounts that GCP applied to your usage.
- Include Taxes: Includes any taxes that GCP applied to your bill. For example, VAT or US sales tax. This option is enabled by default.
- Include Promotions: Includes all promotional credits. These promotional credits are considered a form of payment and are automatically applied to reduce your total bill when available.
Azure-specific Preferences
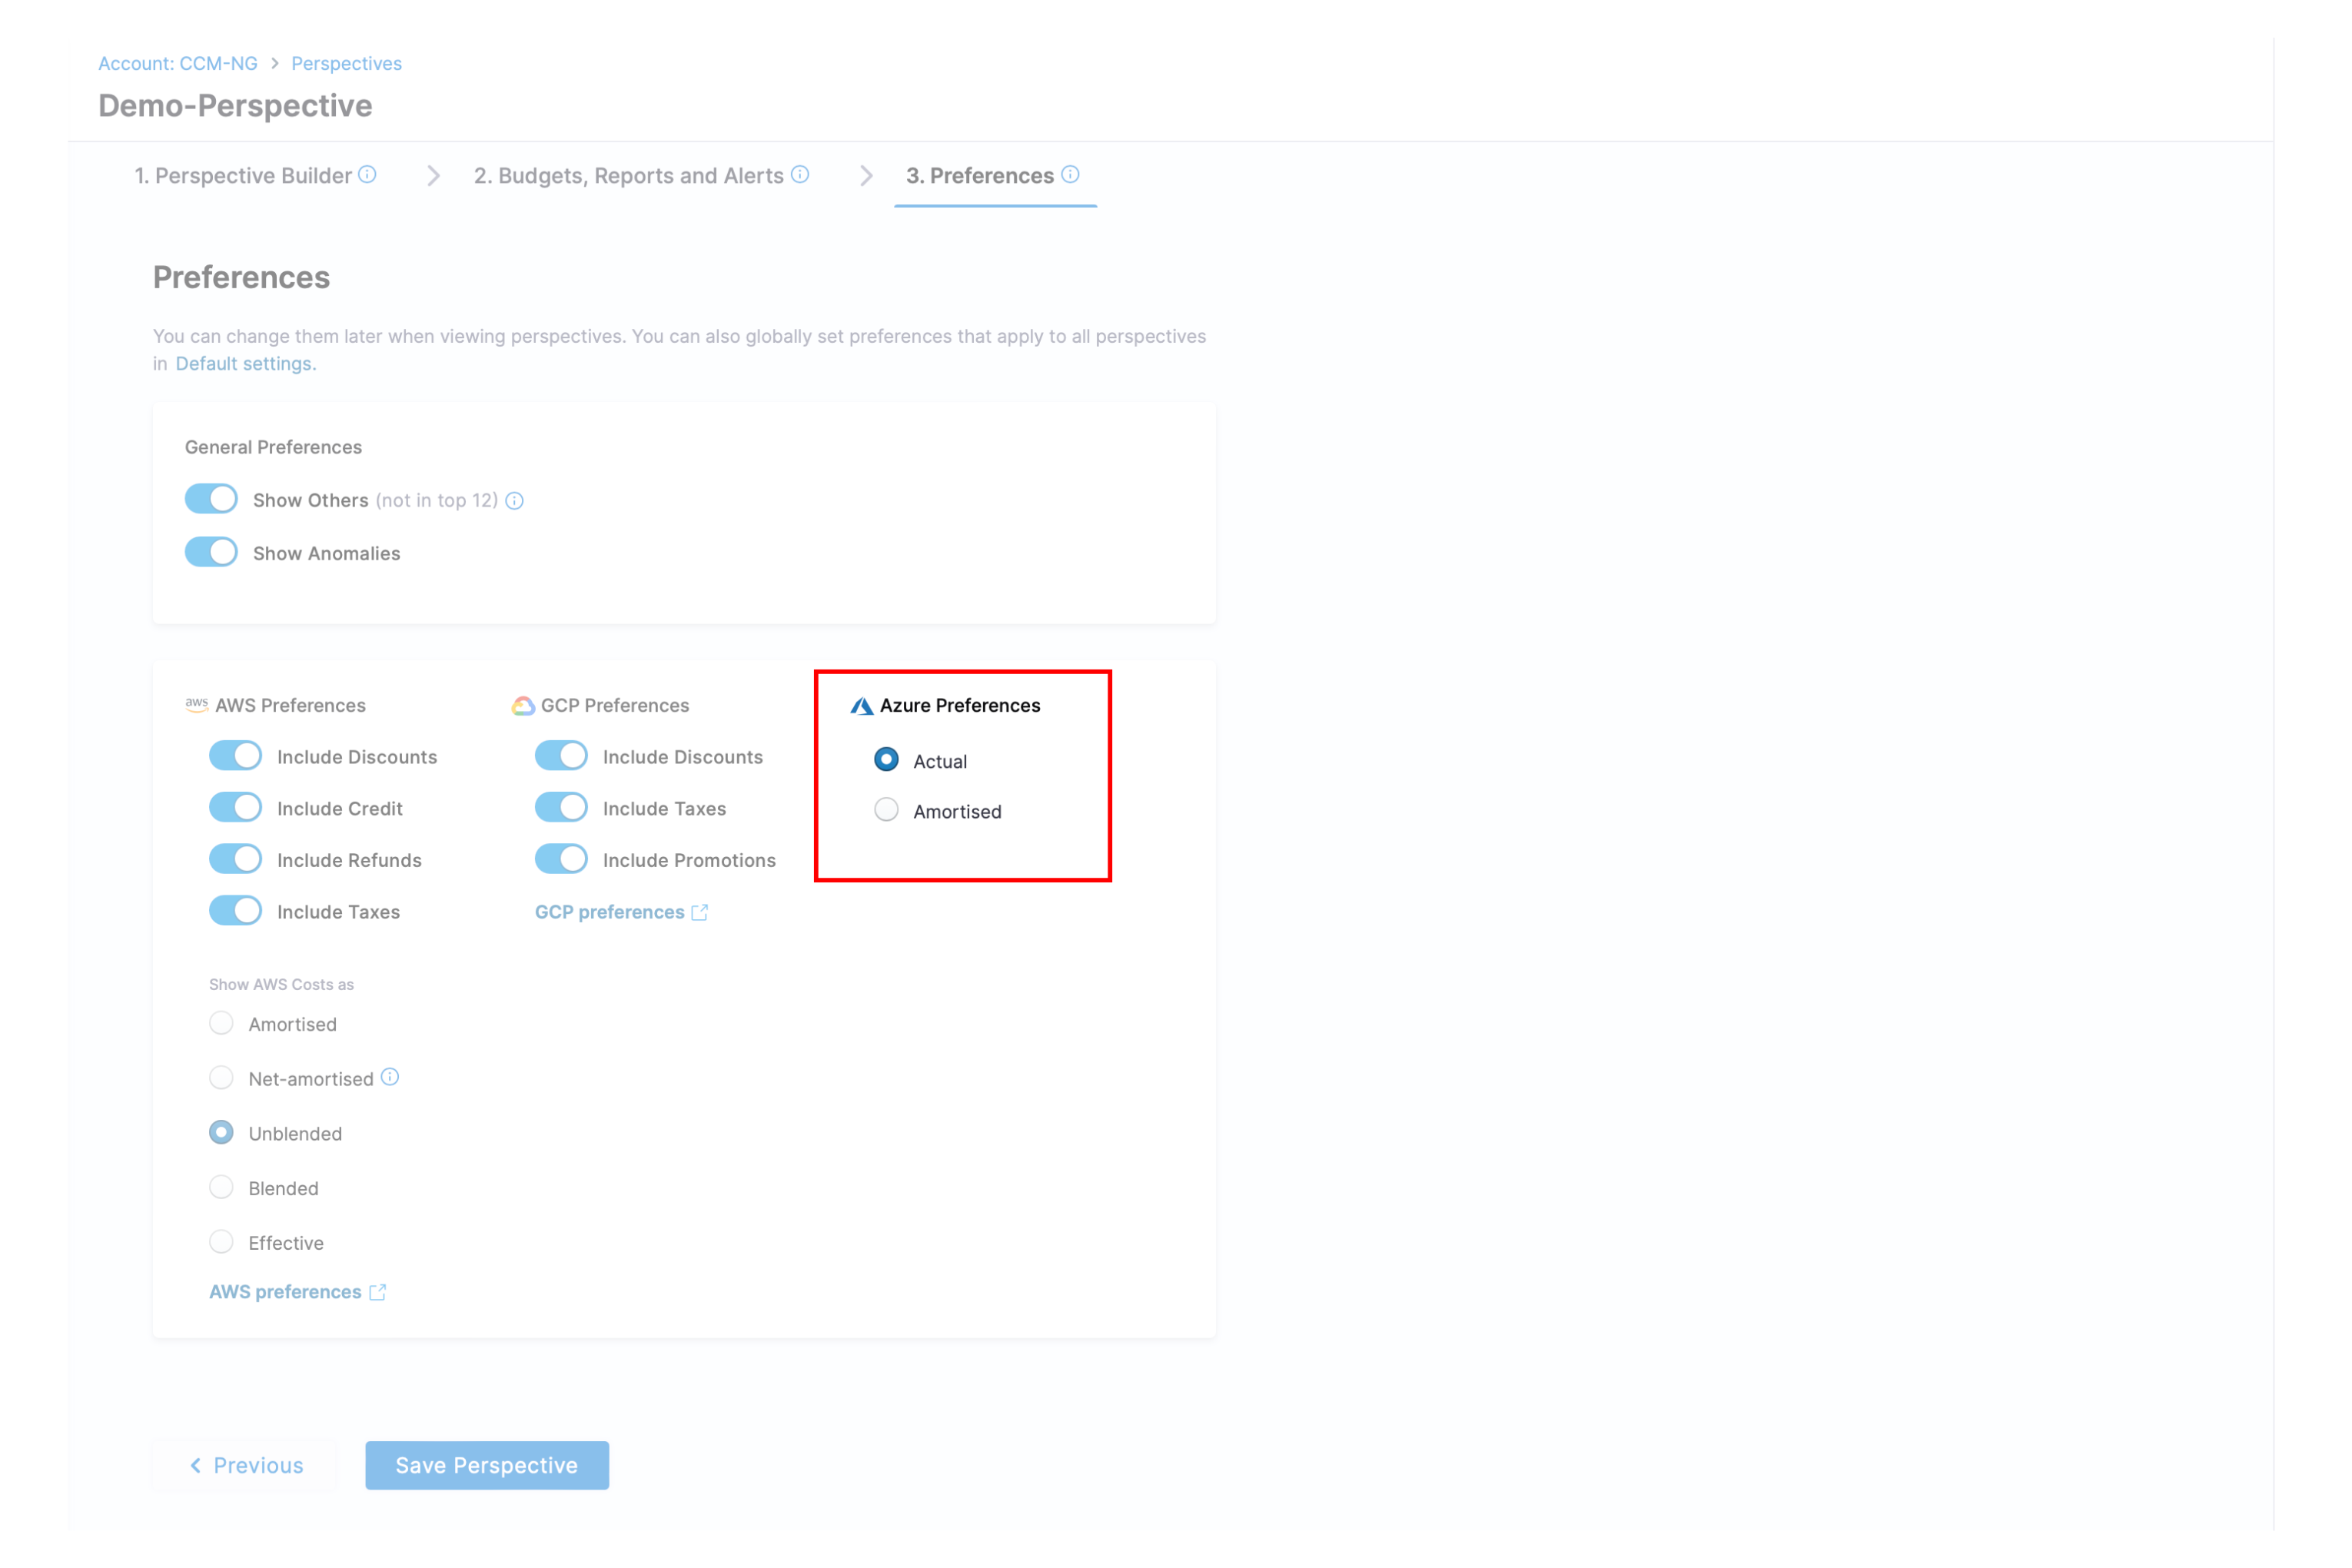
Azure provides two types of cost export metrics: Actual Cost and Amortized Cost, each serving distinct financial tracking and analysis needs. In the Azure portal, users can toggle between these cost types to gain insights into their billing data. CCM allows users to configure their Azure connector to support both cost types, offering enhanced visibility and control over their expenses.
Azure Cost Types
-
Actual Cost: Refers to the real-time, pay-as-you-go pricing for Azure resources and services. It is calculated based on hourly or per-minute usage, directly reflecting the charges that can vary with demand and utilization. This cost model is ideal for real-time monitoring and cost analysis, as it provides a precise view of expenses as they occur.
-
Amortized Cost: Offers a predictable, averaged representation of costs over a specified period, typically on a monthly basis. This approach spreads the upfront payments or commitments of Reserved Instances (RIs) over their term, which can be either one or three years. Amortized costs are particularly useful for evenly distributing expenses over reservation terms, aiding in financial projections and budgeting by providing a stable cost structure.
To accommodate the diverse needs of different teams, CCM supports the setup of both Actual and Amortized cost exports within the same connector. Users can view and toggle between these costs in their perspectives.
-
In order to accurately track costs, ensure that your connector has one billing type set to "Actual." If not set while creating the connector, the creation will fail. For existing connectors, update them such that one of the billing types should be "Actual"; otherwise, connector test connection would fail.
-
Billing type will be set to "Actual" in billing export in places where billing type was not present before this feature launch.
-
CCM will maintain data with the Azure cost type set to "Actual." All cost computations will be based on this setting.
-
For Active Spend and License-Util APIs, Costs will be queried assuming Azure cost type "Actual".
-
Prior to Azure preferences, all data was ingested as 'Actual,' even if Amortized billing was used. After Azure preferences, we ingested the new Amortized billing export data. Due to this, in some cases, 'Actual' data might no longer show. To fix this, kindly change the Azure cost type filter to 'Amortized'.